Daniel Azuma (dazuma@kagi.com)
Multi-Res Modeling Group
Using 3dpalign
- Introduction
- 3dpalign files
-
Using 3dpalign

- Tips and techniques
- Appendices
|
3dpalign user's manual
Daniel Azuma (dazuma@kagi.com) Multi-Res Modeling Group Using 3dpalign |
Contents
|
| The interface |
The screen shot below shows the basic user interface for 3dpalign.
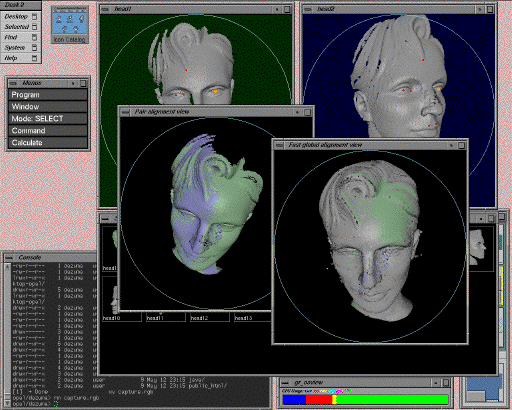
The very wide window near the bottom of the screen (mostly hidden in this screen shot) is the select window. Use this window to select two range images at a time to work with.
The two windows at the top of the screen are the current working windows. They show the two range images you are currently working with. Use these windows to identify corresponding features in the two range images.
The two windows in the middle of the screen, in front of the others, are alignment view windows, which show current results of alignment. Shown in the screen shot are the pairwise window (on the left) and the fast global window (on the right). Not shown is the full global window.
On the left side of the screen is the menu palette window. This window contains menus that you use to control 3dpalign.
| Choosing images |
The first step in using 3dpalign is to choose two range images to work with. This is done using the bottom window, titled "select".
The select window contains a number of icons, one for each range image. Each icon is labeled with the name of the range image, and includes a thumbnail picture of the image. Most of these thumbnails will be gray; however, there will also be one green thumbnail and one blue thumbnail. These identify the two range images you are currently working with.
Selecting icons
To select a range image, click its icon with the middle mouse button. The icon will highlight in pink, indicating that it is currently selected. You can deselect the icon by selecting a different icon, or by clicking in an empty area of the select window with the middle mouse button. Furthermore, when an icon is selected, several other icons may be given a yellow tinge. Those are the icons for which you have already established corresponding features with the currently selected icon.
When an icon is selected, you can put it into one of the working windows-- the windows with the dark green and dark blue backgrounds-- simply by clicking in the window with the middle mouse button. That range image will then be placed into the working window, and its icon will be given a greenish or bluish color, indicating that you are now working with that range image. The icon image which was previously in that working window will revert to gray.
Arranging the icons
You can also rearrange the icons in the select window using the left mouse button. To move an icon, click and drag that icon with the left mouse button. To scroll the entire window, click and drag in an empty area of the window. This may be useful if you wish to arrange the icons according to which pairs of range images you have already done and which remain to do.
You can clean up the icon arrangement by clicking the right mouse button and selecting "Clean up icons" from the menu. This moves the icons to their default arrangement.
| Identifying features |
When you have selected two images to work with, you can then identify corresponding features in those two images. You should identify corresponding features for as many different pairs of range images as you can. In general, the more feature correspondences you identify, the better the alignment will work.
Setting the view
While you are identifying features, you may find it useful to change your view of the range image, see a different face of the image, or zoom in or out. You can do so in the two working windows using the left mouse button. To rotate the image, click and drag using the left mouse button. To zoom in or out, hold down the control key, and click and drag using the left mouse button; dragging up zooms in, and dragging down zooms out. To translate, or move, the image to one side, hold down the shift key, and click and drag using the left mouse button. When you change the view of a range image, the icon thumbnail will also change to match.
For better performance while you're adjusting the view of the range image, you can change the quality of the view during motion. To change the quality, click with the right mouse button, and select a subsampling rate from the menu. 5x5 subsampling gives the sparsest (lowest-quality) view and fastest performance. Full sampling gives the densest (highest-quality) view and slowest performance. This menu only affects the quality of the view while you're moving it; once you've let go, it will revert to the original quality. For the two working windows, the default quality is full sampling. You can also use this menu to set the quality for normal (non-moving) display. The default quality for normal display is also full sampling.
Creating new features
You can create two kinds of corresponding features-- strong and weak. These differ in how the solver treats them-- strong features are weighted more heavily and remain in effect through multiple full global alignment runs. Weak features are used in fast global alignment but are dropped during full global alignment in favor of automatically-generated points. Strong features will appear in the working windows as red points; weak features will appear as magenta points.
To identify new features, first set the mode to "Add strong" or "Add weak" in the "Mode" menu. Then simply click on the appropriate feature using the middle mouse button, first in one of the working windows, then in the other. Dots will appear, indicating the new feature correspondence.
Manipulating features
Once you have identified several features, you may want to go back and change some of them: adjust the position of points, delete features, or change them between strong and weak. 3dpalign provides several tools for this purpose.
First, you must select a feature to work with. To do so, first make sure the mode is set to "select". If it isn't, choose "Select" from the "Mode" menu. Now, you can select an existing feature by clicking it with the middle mouse button. The points identifying that feature in both windows will highlight, so you can see where the feature is located in both range images.
Next, use a command from the "Command" menu to manipulate the feature. You can strengthen (change from weak to strong), weaken (change from strong to weak), or delete directly from the menu.
You can also move a feature. To do this, choose "Move" from the "Command" menu. Then, click the middle mouse button on the new position for that feature in the appropriate working window. The point identifying that feature will then move to its new location.
| Interactive feedback |
3dpalign provides several levels of feedback on how your feature identification is progressing. You can view the current pairwise and fast global alignment as described in this section. You can also view the error vectors associated with your feature correspondences.
Error vectors
The error vectors are displayed in the working windows as thin lines extending from the feature points. These lines indicate the direction and distance of the corresponding feature in the other image when the two images are aligned with one another. You can use them to indicate where you may have imprecisions in your feature correspondences; you will often find that the error vectors will point in the direction you should move the point to mark that feature more precisely. If the errors are very small, you may need to zoom in significantly in order to see these error vectors.
Pairwise alignment
If you have established at least three pairs of corresponding features for the two current working range images, 3dpalign can dynamically show you how it is currently aligning those two range images. This view is shown in the pairwise alignment window. The alignment is automatically recalculated and updated whenever you make changes to the set of corresponding features, so you know instantly what kind of effect your work will have.
To open the pairwise alignment window, select "Show pairwise alignment" from the "Window" menu. The window will show both range images, aligned according to your current feature correspondences. The images will be colored blue and green, according to the corresponding working windows. If you have not yet established at least three corresponding features for the two range images, the pairwise alignment window will be blank.
You can close the window by choosing "Hide pairwise alignment" from the "Window" menu. Do not attempt to close the window using the normal window manager methods (such as double-clicking the upper left corner under SGI 4DWM), or you will cause the program to abort.
You can change your view in the pairwise alignment window using the left mouse button, in the same way you change your view in the working windows. To rotate the view, click and drag the left mouse button. To scale, hold down the control key, and to translate, hold down the shift key. You can also change the view quality during motion by clicking with the right mouse button and choosing an item from the menu. The default quality for the pairwise alignment window is 2x2 subsampling.
Fast global alignment
If you have established at least three pairs of corresponding features for a sufficient number of pairs of range images, 3dpalign can calculate a fast guess at a global alignment. This view is shown in the fast global alignment window. This alignment is also automatically recalculated and updated whenever you make changes to the set of corresponding features.
To open the fast global alignment window, select "Show fast global alignment" from the "Window" menu. The window will show all the range images, aligned according to your current feature correspondences. The two current working images will be colored blue and green; the remaining range images will be gray. If you have not yet established a sufficient number of corresponding features, the fast global alignment window will be blank. You can also change the view in the fast global alignment window using the left mouse button, and you can change the view quality during motion using the right mouse button. The default quality for the fast global alignment window is 4x4 subsampling.
You can close the window by choosing "Hide fast global alignment" from the "Window" menu. Do not attempt to close the window using the normal window manager methods (such as double-clicking the upper left corner under SGI 4DWM), or you will cause the program to abort.
Fast global alignment may take some time, especially if you have many images. It also may take a significant amount of time to redraw the current view in the fast global alignment window. Therefore, to speed up operation while you are building your feature correspondences, you may normally want to keep this window closed.
| Refining alignment |
To further refine the alignment, you can also instruct 3dpalign to calculate a "full global alignment". This is a relatively time-consuming process in which the system will attempt to automatically find additional corresponding features between neighboring range images, and use this automatically-generated information to find a better fit for the range images. This process can be repeated any number of times.
Calculating refined alignment
Unlike the pairwise and fast global alignment, the current refined alignment is not automatically recalculated and updated when you make changes to your feature correspondences. Instead, you explicitly tell 3dpalign when you want to attempt to refine the alignment.
To run one refinement of the alignment, invoke the "Step full global alignment" command in the "Calculate" menu. This will run the refinement process once, using the current refined alignment as a starting point. If a refined alignment does not yet exist, the current fast global alignment is used as the starting point. The result of the refinement becomes the new refined alignment, and it will itself be used as the starting point for any further refinment runs.
If you change your feature correspondences, you may wish to reset the refined alignment and use your new feature correspondences as a starting point. To do this, select the "Reset full global alignment" item in the "Calculate" menu. This will throw away any current refined alignment, so that the next refinement will use the current fast global alignment as the starting point.
Viewing refined alignment
To open the refined global alignment window, select "Show full global alignment" from the "Window" menu. The window will show all the range images arranged according to the current refined alignment. The two current working images will be colored blue and green; the remaining range images will be gray. If a refined alignment does not currently exist-- that is, you either have not yet calculated a refined alignment, or you have reset it using the menu command-- the full global alignment window will be blank. You can also change the view in the full global alignment window using the left mouse button, and you can change the view quality during motion using the right mouse button. The default quality for the full global alignment window is 4x4 subsampling.
Refinement and feature correspondences
The refinement process treats strong and weak feature correspondences differently. Whereas fast global alignment uses both your strong and weak features and weights them equally, refinement uses ONLY your strong correspondences, plus the new points it generates automatically. Furthermore, your strong feature correspondences are weighted much more heavily than the automatically-generated correspondences. This is done in order to "anchor" the refinement process and prevent range images from drifting.
Because of this behavior, it is usually good practice to use strong correspondences for features you are certain are precise, and use weak correspondences for features about which you are not as certain.
| Finishing up |
To save your work, use the "Save" command in the "Program" menu. This command does two things. First, it saves the feature correspondences you have made, and the current view settings and icon positions for all the range images, so you can continue later where you left off. As with any program, the rule of thumb is "save early, save often", to minimize the chance of losing your work.
Second, it saves any available global alignment data to an "malign" field in all the .params files for your range images. If "malign" fields already exist in the .params files, they are overwritten. If a full (refined) global alignment exists, this alignment is saved; otherwise, if enough information is available to calculate a fast global alignment, that is saved; otherwise, no alignment is saved.
To exit the program, use the "Quit" command in the "Program" menu.
Daniel Azuma (dazuma@kagi.com)